Table of Contents
1. What is DHCP Snooping?
DHCP (Dynamic Host Configuration Protocol)) Snooping is a network security mechanism deployed on Ethernet switches to block unauthorized DHCP servers from assigning IP addresses to clients. It works by inspecting DHCP messages and allowing only those from trusted ports to pass, preventing rogue IP address assignments and ensuring a secure and stable network environment.
2. Why Do We Need DHCP Snooping?
In enterprise, campus, or even public networks, DHCP-related problems aren’t uncommon—and they can cause serious disruptions. Sometimes it’s just a misconfigured device accidentally acting as a DHCP server, handing out wrong IP addresses and breaking connectivity. Other times, it’s more deliberate—like an attacker setting up a rogue DHCP server to reroute users through a fake gateway or DNS server, opening the door to man-in-the-middle attacks. Even clients manually assigning themselves static IPs can create chaos, leading to conflicts and making the network harder to manage securely.
Benefits of DHCP Snooping:
- Blocks rogue DHCP servers from interfering with the network.
- Ensures clients receive accurate IP addresses and network configurations.
- Strengthens network security by reducing the risk of attacks.
3. How Does DHCP Snooping Work?
To truly understand how DHCP Snooping works, it’s important to first get a clear picture of how DHCP (Dynamic Host Configuration Protocol) functions. When a device joins the network and doesn’t yet have an IP address, it initiates a conversation with the DHCP server — a four-step handshake that includes: Discover, Offer, Request, and Acknowledge.
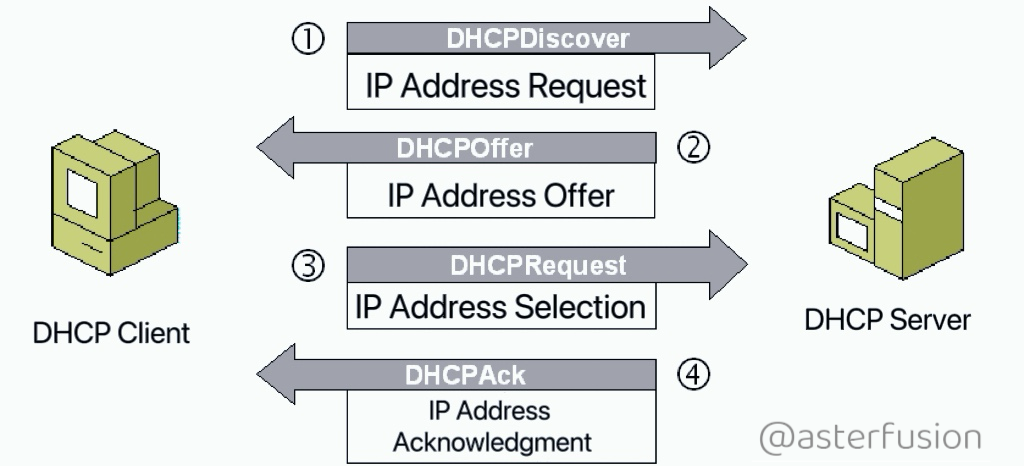
Think of it as a quick negotiation between the device and the server to get an IP identity. The picture below breaks down what happens at each step of this dynamic exchange.
In a DHCP Snooping-enabled network, switch interfaces are divided into two key roles: trusted and untrusted ports.

- Trusted Ports: These connect to legitimate DHCP servers or uplink devices (e.g., routers or core switches) and are allowed to send DHCP server messages (e.g., DHCPOFFER, DHCPACK).
- Untrusted Ports: These connect to regular clients (e.g., PCs or printers) and are restricted to sending only DHCP client messages (e.g., DHCPDISCOVER, DHCPREQUEST).
- By default, all ports are untrusted; trusted ports must be manually configured.
DHCP Message Filtering:
- DHCP server messages (e.g., DHCPOFFER, DHCPACK) from untrusted ports are discarded, preventing rogue DHCP servers from operating.
- Client requests (e.g., DHCPDISCOVER, DHCPREQUEST) can originate from untrusted ports, but server responses are only permitted from trusted ports.
DHCP Binding Table:
- DHCP Snooping maintains a binding table that logs each client’s MAC address, assigned IP address, lease duration, VLAN, and port information.
- This table is used to validate subsequent traffic, preventing IP address spoofing.
Integration with IP Source Guard:
Often paired with IP Source Guard, DHCP Snooping filters traffic based on the binding table, allowing only the assigned IP address to send data from a client, blocking unauthorized IPs.
Support for DHCP Option 82 (Optional):
DHCP Snooping can insert or process DHCP Option 82 (Relay Agent Information), providing the DHCP server with details about the client’s port and switch, enabling more precise IP assignments.
4. Common Attacks Prevented by DHCP Snooping
DHCP Snooping effectively mitigates the following network threats:
Rogue DHCP Server Attacks:
- How It Works: An attacker sets up an unauthorized DHCP server to distribute incorrect IP addresses, gateways, or DNS servers.
- Impact: Client traffic is redirected to the attacker’s device, enabling MITM attacks, traffic interception, or DNS spoofing.
- Defense: DHCP Snooping discards server messages from untrusted ports, allowing only trusted ports to send DHCP responses.
DHCP Starvation Attacks:
- How It Works: An attacker floods the network with DHCPDISCOVER requests, exhausting the DHCP server’s IP address pool.
- Impact: Legitimate clients cannot obtain IP addresses, disrupting network services.
- Defense: When combined with port security or rate-limiting DHCP requests per port, DHCP Snooping prevents excessive traffic from overwhelming the server.
Man-in-the-Middle (MITM) Attacks:
- How It Works: A rogue DHCP server assigns a fake gateway or DNS server, routing client traffic through the attacker’s device.
- Impact: The attacker can monitor, modify, or redirect client communications.
- Defense: DHCP Snooping ensures only trusted DHCP messages are processed, blocking malicious configurations.
IP Spoofing Attacks:
- How It Works: A client manually configures an unauthorized IP address to impersonate a legitimate host.
- Impact: This can cause IP conflicts, network disruptions, or serve as a stepping stone for further attacks.
- Defense: By integrating with IP Source Guard and the DHCP binding table, DHCP Snooping blocks traffic from unauthorized IP addresses.
5. Where Is DHCP Snooping Most Critical?
DHCP Snooping is particularly valuable in the following scenarios:
- Public Networks: In environments like coffee shops, hotels, or co-working spaces, rogue DHCP servers could be deployed by malicious users to steal data or launch attacks.
- Enterprise Networks: Large networks with multiple departments or VLANs rely on DHCP Snooping to ensure clients connect to the correct DHCP server.
- High-Security Environments: In settings requiring compliance with data protection regulations (e.g., GDPR, CCPA), DHCP Snooping helps prevent unauthorized access.
- Protection Against DHCP Spoofing: It mitigates risks of clients being redirected to malicious gateways, enhancing overall network security.
6. Best Practices for Implementation
- Deployment: Enable DHCP Snooping on Layer 2 switches.
- Complementary Features: Combine with Port Security, Dynamic ARP Inspection (DAI), and IP Source Guard for enhanced protection.
- Port Configuration: Designate only uplink or trunk ports as trusted; keep client-facing ports untrusted.
7. What is the difference of DHCP and Static IP ?
DHCP and static IP are the two most common ways to assign IP addresses in a network — and each serves a different purpose.We compare them not to decide which is better, but to understand when to use which. Knowing their strengths and trade-offs helps you make smarter choices in network design and device configuration.
| Aspect | DHCP | Static IP |
| Allocation Method | Automatically assigned by server | Manually configured |
| Management Effort | Low, good for large deployments | High, requires individual setup |
| Address Stability | May change each time a device connects | Fixed and unchanging |
| Setup Efficiency | Fast, plug-and-play | Slow, needs manual input |
| Ideal For | End-user devices, dynamic environments | Servers, printers, critical devices |
| Security | Needs protection mechanisms (e.g., DHCP Snooping) | More controlled, risk of misconfigurations |
8. DHCP Configuration on Asterfusion SONiC OS based Campus Switches
8.1 DHCP server configuration.
dhcp pool name # Create a DHCP address pool and enter the DHCP configuration view
network ip-address mask # Configure the network segment dynamically allocated by the DHCP address pool
address-pool ip-address ip-address # Configure the IP address range dynamically allocated by the DHCP address pool
routers ip-address # Configure the assigned gateway for DHCP clients
dns ip-address # Configure the DNS address assigned to the DHCP client
lease-time default-time max-time # Configuring the lease validity period of dynamically allocated IP addresses
tftp-server server-name # Configure the TFTP server address assigned to the DHCP client
bootfile-name bootfile # Configure the startup file name assigned to the DHCP client
next-server ip-address # Configure the next server IP address that provides services assigned to the DHCP client.
vlan vlan-id # Bind the created DHCP address pool to the specified VLANif interface
Example:
sonic(config)# dhcp pool dhcp1
sonic(config-dhcp-pool-dhcp1)# network 10.0.10.100 255.255.255.0
sonic(config-dhcp-pool-dhcp1)# address-pool 10.0.10.101 10.0.10.200
sonic(config-dhcp-pool-dhcp1)# routers 10.0.10.1
sonic(config-dhcp-pool-dhcp1)# dns 8.8.8.8
sonic(config-dhcp-pool-dhcp1)# lease-time 300 600
sonic(config-dhcp-pool-dhcp1)# tftp-server server1
sonic(config-dhcp-pool-dhcp1)# bootfile-name dhcpboot1
sonic(config-dhcp-pool-dhcp1)# next-server 10.0.10.248
sonic(config-dhcp-pool-dhcp1)# vlan 101
8.2 DHCP relay configuration
configure terminal # Enter system configuration view
dhcp-relay relay-name {v4|v6} # Create a DHCP relay instance and enter the DHCP relay view
down_link interface vlan vlan-id
# Specify the VLAN to which the client that needs to dynamically assign an IP address belongs
up_link interface interface-type interface-name
# Specify the interface through which the device connects to the DHCP server
server_ip ip-address # Specify the IP address of the DHCP server
loopback_interface loopback ID # Configure the loopback port as the relay agent IP
no_option82 # Enable not encapsulating the option82 field
dhcp-agent address ip-address # Configure relay agent IP address
Example:
sonic(config)# dhcp-relay relay1 v4
sonic(config-dhcp-relay-relay1__v4)# down_link interface vlan 102
sonic(config-dhcp-relay-relay1__v4)# up_link interface ethernet 20
sonic(config-dhcp-relay-relay1__v4)# server_ip 10.0.10.240
sonic(config-dhcp-relay-relay1__v4)# loopback_interface loopback 0
sonic(config-dhcp-relay-relay1__v4)# no_option82
sonic(config-dhcp-relay-relay1__v4)#exit
sonic(config)#interface vlan 102
sonic(config-vlanif-102)# dhcp-agent address 10.0.10.20
8.3 DHCP snooping configuration
configure terminal # Enter system configuration view
dhcp snooping enable{v4|v6} # Enable DHCP Snooping function, default disable.
interface ethernet interface-id # Enter interface view
dhcp-snooping enable # Enable DHCP Snooping function, default disable.
dhcp-snooping trusted # Set the trust status of the port, default untrusted.
Example:
sonic# configure terminal
sonic(config)# dhcp snooping enable v4
sonic(config)# interface ethernet 20
sonic(config-if-20)# dhcp-snooping enable
sonic(config-if-20)# dhcp-snooping trusted
8.4 ND snooping configuration
configure terminal # Enter system configuration view.
nd snooping enable # Enable nd Snooping function, default disable.
vlan ID # Enter vlan view.
nd snooping enable # Enable nd Snooping function, default disable.
Example:
sonic# configure terminal
sonic(config)# nd snooping enable
sonic(config)# vlan 101
sonic(config-vlan-101)# nd snooping enable
9. DHCP configuration case
9.1 Case 1 DHCP service and relay
9.1.1 Requirements
User 1 and User 2 of the client company belong to Department A, User 3 and User 4 belong to Department B, switch1 acts as a DHCP relay, and switch2 acts as a DHCP server. It is required that department A be assigned an IP address between 10.1.2.2 and 10.1.2.100, and department B be assigned an IP address between 10.1.10.2-10.1.10.100.
9.1.2 Topology

9.1.3 Configuration steps
Step 1
Switch1
sonic# configure terminal
sonic(config)# vlan 100
sonic(config-vlan-100)# exit
sonic(config)# interface ethernet 1
sonic(config-if-1)# switchport access vlan 100
sonic(config-if-1)# exit
sonic(config)# interface ethernet 2
sonic(config-if-2)# switchport access vlan 100
sonic(config-if-2)# exit
sonic(config)# interface vlan 100
sonic(config-vlanif-100)# ip address 10.1.2.1/24
sonic(config)# vlan 200
sonic(config-vlan-200)# exit
sonic(config)# interface ethernet 3
sonic(config-if-3)# switchport access vlan 200
sonic(config-if-3)# exit
sonic(config)# interface ethernet 4
sonic(config-if-4)# switchport access vlan 200
sonic(config-if-4)# exit
sonic(config)# interface vlan 200
sonic(config-vlanif-200)# ip address 10.1.10.1/24
sonic# configure terminal
sonic(config)# interface ethernet 5
sonic(config-if-5)# ip address 10.110.1.1/24
sonic(config)# interface loopback 0
sonic(config-if-lo0)# ip address 10.120.1.1/32
sonic(config)# dhcp-relay relay1 v4
sonic(config-dhcp-relay- relay1__v4)# down_link interface vlan 100
sonic(config-dhcp-relay- relay1__v4)# down_link interface vlan 200
sonic(config-dhcp-relay- relay1__v4)# up_link interface 5
sonic(config-dhcp-relay- relay1__v4)# server_ip 10.110.1.2
sonic(config-dhcp-relay- relay1__v4)# loopback_interface loopback 0
sonic(config-dhcp-relay- relay1__v4)# exitStep 2
Switch2
sonic# configure terminal
sonic(config)# vlan 300
sonic(config-vlan-300)# exit
sonic(config)# vlan 100
sonic(config-vlan-100)# exit
sonic(config)# vlan 200
sonic(config-vlan-200)# exit
sonic(config)# interface ethernet 5
sonic(config-if-5)# switchport access vlan 300
sonic(config-if-5)# switchport trunk vlan 100
sonic(config-if-5)# switchport trunk vlan 200
sonic(config-if-5)# exit
sonic(config)# interface vlan 300
sonic(config-vlanif-300)# ip address 10.110.1.2/24
sonic# configure terminal
sonic(config)# dhcp pool userA
sonic(config-dhcp-pool-userA)# network 10.1.2.1 255.255.255.0
sonic(config-dhcp-pool-userA)# address-pool 10.1.2.2 10.1.2.100
sonic(config-dhcp-pool-userA)# dns 8.8.8.8
sonic(config-dhcp-pool-userA)# vlan 100
sonic(config-dhcp-pool-userA)# exit
sonic(config)# dhcp pool userB
sonic(config-dhcp-pool-userB)# network 10.1.10.1 255.255.255.0
sonic(config-dhcp-pool-userB)# address-pool 10.1.10.2 10.1.10.100
sonic(config-dhcp-pool-userB)# dns 8.8.8.8
sonic(config-dhcp-pool-userB)# vlan 200
sonic(config-dhcp-pool-userB)# exit
sonic(config)# dhcp pool dhcpmgmt
sonic(config-dhcp-pool-dhcpmgmt)# network 10.110.10.1 255.255.255.0
sonic(config-dhcp-pool-dhcpmgmt)# address-pool 10.110.1.1 10.110.1.2
sonic(config-dhcp-pool-dhcpmgmt)# vlan 300
sonic(config-dhcp-pool-dhcpmgmt)# exit


